
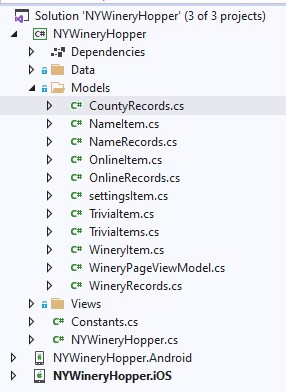
We will begin with our Models directory. This is not necessarily created by the template chosen in the beginning, so you may need to right-click on the Portable Class Library (PCL) project and Add-New Folder. As you can see, most of these are created as pairs with Item and Records files. As we discover the C# code behind each of these classes, the reason for this design will become quite obvious

As shown above, each of these files is a cs class file. These are created with a right-click on the Models directory, Add – Class. CountyRecords.cs, one of the single-file classes, contains the code shown below.
using System.Collections.Generic;

namespace NYWineryHopper.Models
{
    public class CountyRecords
    {
        public List<string> records { get; set; }
    }
}
Why is this a “single-file” class? Because it consists of s simple list of strings. As we cover the remaining classes, this design will become quite clear.
Now for the class structure explanation. The using statement on line 1 is the only collection required for the simplest classes. In order to keep our program running as “lean and mean” as possible, we do not in clude more code than required. Yes, each Using statement rolls additional code and functionality into your program. The next line, namespace, basically gives the location where this file will be found. You will discover the meaning of the namespace structure as we get deeper into the individual programming sections.
Next, we get to the “meat” of our program – the CountyRecords class itself. Since we are accessing these models and their contents elsewhere in our program, all are declared with the “public” keyword. As previously stated, this class contains only a simple list of strings, which is the reason for the keyword “string” inside of the brackets following List. What happens later in our C# code? We will populate this class with a variable number of counties depending on how many counties exist in the state of New York. The upcoming classes will include the code contained without as much explanation.
public class NameItem
{
public int Id { get; set; }
public string Name { get; set; }
public string Latitude { get; set; }
public string Longitude { get; set; }
}
public class NameRecords
{
public List<NameItem> records { get; set; }
}
The code shown at the left goes into the NameItem.cs (class file) and NameRecords.cs (class file). Now it is time for a bit of an explanation about the requirement for two files required for a specific “Item.” As you can see, there is really only a single line contained in the NameRecords class. This will load a list of NameItem records. Looking at the NameItem class, we see that each of the items in the NameItem list will contain a numeric Id plus Name, Latitude and Longitude strings. We will see that Online, Trivia and Winery Items follow this same pattern. Since WineryPageViewModel has a different focus, we save that for last.
public class OnlineItem
{
public string Id { get; set; }
public string Description { get; set; }
public string Url { get; set; }
public string Recid { get; set; }
}
public class OnlineRecords
{
public List<OnlineItem> records { get; set; }
}
public class TriviaItem
{
public string Question { get; set; }
public string Answer { get; set; }
public string Hint { get; set; }
}
public class TriviaItems
{
public List<TriviaItem> records { get; set; }
}public class WineryItem
{
public int Id { get; set; }
public string Name { get; set; }
public string Address { get; set; }
public string City { get; set; }
public string State { get; set; }
public string Zip { get; set; }
public string County { get; set; }
public string Website { get; set; }
public string Phone { get; set; }
public string Type { get; set; }
public int Tastings { get; set; }
public int Tours { get; set; }
public string Region { get; set; }
public string Fblink { get; set; }
public string Twlink { get; set; }
public string Inlink { get; set; }
public string Welink { get; set; }
public string Golink { get; set; }
continued->next columnpublic string Yelink { get; set; }
public string Trlink { get; set; }
public string Yolink { get; set; }
public bool TwIcon { get; set; }
public bool FaIcon { get; set; }
public bool YoIcon { get; set; }
public bool WeIcon { get; set; }
public bool IgIcon { get; set; }
public bool InIcon { get; set; }
public bool YeIcon { get; set; }
public bool TrIcon { get; set; }
public string Latitude { get; set; }
public string Longitude { get; set; }
public string strDistance { get; set; }
public int intDistance { get; set; }
}
public class WineryRecords
{
public List<WineryItem> records { get; set; }
}public class WineryPageViewModel : BaseViewModel
{
private string txtLabel1;
private string txtLabel2;
private string txtDisplay1;
private string txtDisplay2;
public WineryPageViewModel()
{
}
public string TxtLabel1
{
get { return txtLabel1; }
set { SetProperty(ref txtLabel1, value); }
}
public string TxtLabel2
{
get { return txtLabel2; }
set { SetProperty(ref txtLabel2, value); }
}
public string TxtDisplay1
{
get { return txtDisplay1; }
set { SetProperty(ref txtDisplay1, value); }
}
public string TxtDisplay2
{
get { return txtDisplay2; }
set { SetProperty(ref txtDisplay2, value); }
}
}As promised, we have left the WineryPageViewModel for last. Compare this Model class file to the others shown here and notice the differences. The first thing to notice is that this is a ViewModel class and it inherits BaseViewModel. Inherits? Yes, that is the meaning of the “:” following class name. Actually, the WineryPageViewModel class can override some of the functionality that was inherited from BaseViewModel.
Next, you should notice that these string members contain more than just empty “getters and setters” using a return of the variable inside of get and they set the property inside of set. Other than inheritance and a different get-set approach, maybe the PageViewModel is not so different from the other classes we have seen.
We have seen the classes that determine the format of our data, but how to we populate the lists of items? That will be explored and explained in our next post – Creating the Data Directory