
We will start with the basic excel sheet design. Place the word “Month” in cell A1 and numbers 1 to 31 in B1 to AF1. Also place the word “Total” in cell AG1. Now place the months “January” to “December in cells A2 to A13. You have completed the basic spreadsheet that we will be using.
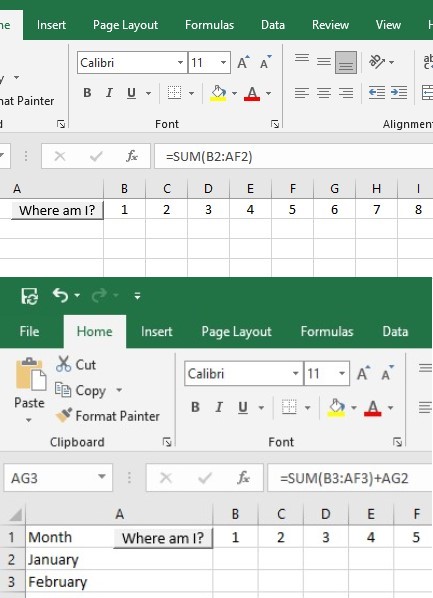
Now we will add the first bit of functionality to the spreadsheet by activating the TOTAL column. Go to cell AG2 and type in (without the quotes) “=SUM(B2:AF2)” and press the <Enter> button. It will display 0 because you haven’t yet entered any mileage. Do you think that you can copy that formula down for the rest of the rows and be finished with the totals? This would work to total only each row, but we want a running total of current mileage. For that to work properly we need to take the sum of the current row and add it to the total above it. In cell AG3, type (without the quotes) “=SUM(B3:AF3) + AG2” and press the <Enter> button. You can copy this formula to all rows until 13 and it will work.
Now that we have the mileage calculations, we have a basic mileage spreadsheet. You can name this sheet with a name like “Log2021” and copy the contents to new sheets named “Log 2022,” “Log2023” and so on. With slight modifications to the TOTAL column you can have a running total across the years. Although this feat may be impressive to some people, it is far short of what you can do with Excel. Let’s get into the fun stuff.
You will use two sheets to feed the location and longitude/latitude information to this application. These sheets are appropriately named “Location” and “LongLat.” You can go ahead and create them now by adding sheets to your workbook and appropriately naming them (generally you will click on the worksheet tab to the right of the last tab, bottom of your Excel sheet, to add a new sheet and double-click on the sheet name to change it). The two screen shots below show the top portion of these two sheets. You should download the Excel Macro-enabled worksheet (click Enable Content after opening) so that these sheets can be copied into your own workbook (or you can follow along without creating the sheets and code). Note that the data contained in the LongLat tab is no longer available at the credited link.
Next, we can work on the WhereAmI form which it uses.