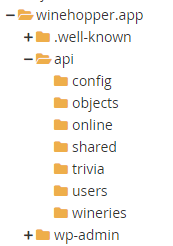
he first thing to do is create the directory structure. For our Representational State Transfer (REST) Read services we are using the directory structure shown below from our WordPress site File Viewer

The basic file called core.php goes into our config directory. Code for that file is:
<?php
// show error reporting
ini_set('display_errors', 1);
error_reporting(E_ALL);

// home page url
$home_url="http://localhost/api/";

// page given in URL parameter, default page is one
$page = isset($_GET['page']) ? $_GET['page'] : 1;

// set number of records per page
$records_per_page = 5;

// calculate for the query LIMIT clause
$from_record_num = ($records_per_page * $page) - $records_per_page;
?>
In that same Config directory, we have a file called database.php. The code in that file is:
<?php
class Database{

    // specify your own database credentials
    private $host = "localhost";
    private $db_name = "* database name goes here *";
    private $username = "* username *";
    private $password = "* password *";
    public $conn;

    // get the database connection
    public function getConnection(){

        $this->conn = null;

        try{
            $this->conn = new PDO("mysql:host=" . $this->host . ";dbname=" . $this->db_name, $this->username, $this->password);
            $this->conn->exec("set names utf8");
        }catch(PDOException $exception){
            echo "Connection error: " . $exception->getMessage();
        }

        return $this->conn;
    }
}
?>
Those are the two files in our Web Root/API directory. They provide access to the custom MySQL database created on our server, database name, tables and fields to be discussed in later posts. Move on to step 2.

1 thought on “Building Your PHP Rest Service (step 1)”